3.1.12. INTERLOCK Command
The INTERLOCK command allows to configure the external interlock inputs that are present on the unit’s back panel.
In case of an external interlock trigger, the output is disabled (see the Power Supply Finite State Machine chapter) and the fault is reported in the Fault Register.
The interlock command allows to:
enable/disable interlock detection
set interlock polarity (direct- detect interlock when it is high; inverse - detect interlock when it is low)
change the related interlock name (name associated to the interlock)
set intervention time
The detecting logic for a single interlock is represented in the following figure:
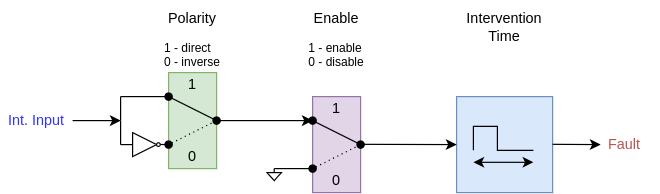
The interlock intervention time specifies how much time the interlock condition should be valid in order to trip the interlock fault. It is also possible to set the intervention time to 0 -> in this case the fault trips immediately, when an interlock condition is detected.

Command Format:
R/W |
Command |
Response |
Description |
|---|---|---|---|
R |
INTERLOCK:NUM:? |
#INTERLOCK:NUM:<int_num> |
Return the number of available interlocks on the unit |
R |
INTERLOCK:ENABLE:? |
#INTERLOCK:ENABLE:<enable> |
Return the interlock’s enable mask |
W |
INTERLOCK:ENABLE:<enable> |
#AK / #NAK |
Set the interlock’s enable mask |
R |
INTERLOCK:ENABLE:<id>:? |
#INTERLOCK:ENABLE:<id>:<0|1> |
Verify the enable status of the single interlock at the specified id |
W |
INTERLOCK:ENABLE:<id>:<0|1> |
#AK / #NAK |
Enable the the single interlock at specified id |
R |
INTERLOCK:POLARITY:? |
#INTERLOCK:POLARITY:<polarity> |
Return the interlock’s polarity mask |
W |
INTERLOCK:POLARITY:<polarity> |
#AK / #NAK |
Set the interlock’s polarity mask |
R |
INTERLOCK:POLARITY:<id>:? |
#INTERLOCK:POLARITY:<id>:<0|1> |
Verify the polarity status of the single interlock at specified id |
W |
INTERLOCK:POLARITY:<id>:<0|1> |
#AK / #NAK |
Select the polarity of the single interlock at the specified id |
R |
INTERLOCK:HARD:? |
#INTERLOCK:HARD:<direct> |
Return the interlock’s direct mask |
W |
INTERLOCK:HARD:<direct> |
#AK / #NAK |
Set the interlock’s direct mask |
R |
INTERLOCK:HARD:<id>:? |
#INTERLOCK:HARD:<id>:<0|1> |
Verify the hard status of the single interlock at the specified id |
W |
INTERLOCK:HARD:<id>:<0|1> |
#AK / #NAK |
Select the hard of the single interlock at the specified id |
R |
INTERLOCK:NAME:<id>:? |
#INTERLOCK:NAME:<id>:<name> |
Read the name of the interlock at the specified id |
W |
INTERLOCK:NAME:<id>:<name> |
#AK / #NAK |
Write the name of the interlock at the specified id |
R |
INTERLOCK:TIME:<id>:? |
#INTERLOCK:TIME:<id>:<time> |
Read the intervention time of the interlock at the specified id |
W |
INTERLOCK:TIME:<id>:<time> |
#AK / #NAK |
Write the intervention time for the interlock at the specified id |
Parameter(s):
Name |
Type |
Description |
|---|---|---|
<int_num> |
integer string |
Integer that specifies the number of available interlocks (for example “4”) |
<id> |
integer string |
Indicates the id of the interlock, for example 1 -> indicates interlock #1, 2 -> interlock #2 etc. |
<enable> |
hex string |
Hex string that indicates the enable status for all the interlocks (1 - enabled; 0 - disabled) |
<polarity> |
hex string |
Hex string that indicates the polarity status for all the interlocks (1 - direct polarity; 0 - inverse polarity) |
<direct> |
hex string |
Hex string that indicates the direct status for all the interlocks (1 - hard; 0 - soft) |
<name> |
string |
String associated to specified interlock |
<time> |
integer string |
Intervention time, that is associated to the specified interlock. The time is specified in [ms] in the range [0,10000]. |
Tip
The enable, polarity and direct are represented by a hex mask. For example if the enable is 0xB -> in binary: b’1011 -> it means that interlock #4, #2 and #1 are enabled and the interlock #3 is disabled. The same for the polarity, so for example if the polarity is 0x3 -> in binary: b’11 -> it means that interlock #2 and #1 use direct polarity and the interlock #3 and #4 use inverse polarity.
Tip
The interlock name (name) is associated the interlock, that is visualized on the local display and on the integrated web interface in case of interlock.
See also
Check the number of the available interlocks and the relative input circuity in the User’s Manual.
Example(s):
INTERLOCK:NUM:?
#INTERLOCK:NUM:4

INTERLOCK:ENABLE:0x3
#AK

INTERLOCK:ENABLE:?
#INTERLOCK:ENABLE:0x3

INTERLOCK:ENABLE:1:0
#AK

INTERLOCK:ENABLE:1:?
#INTERLOCK:ENABLE:1:0

INTERLOCK:POLARITY:0x2
#AK

INTERLOCK:POLARITY:?
#INTERLOCK:POLARITY:0x2

INTERLOCK:POLARITY:3:1
#AK

INTERLOCK:POLARITY:3:?
#INTERLOCK:POLARITY:3:1

INTERLOCK:NAME:2:MAGNET_INTERLOCK
#AK

INTERLOCK:HARD:0x1
#AK

INTERLOCK:HARD:?
#INTERLOCK:HARD:0x1

INTERLOCK:HARD:4:1
#AK

INTERLOCK:HARD:4:?
#INTERLOCK:HARD:4:1

INTERLOCK:NAME:2:MAGNET_INTERLOCK
#AK

INTERLOCK:NAME:2:?
#INTERLOCK:NAME:2:MAGNET_INTERLOCK

INTERLOCK:TIME:2:1000
#AK

INTERLOCK:TIME:2:?
#INTERLOCK:TIME:2:1000